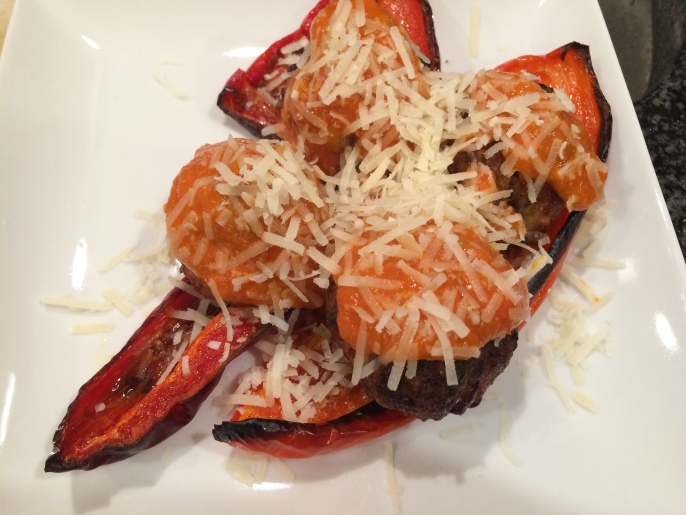
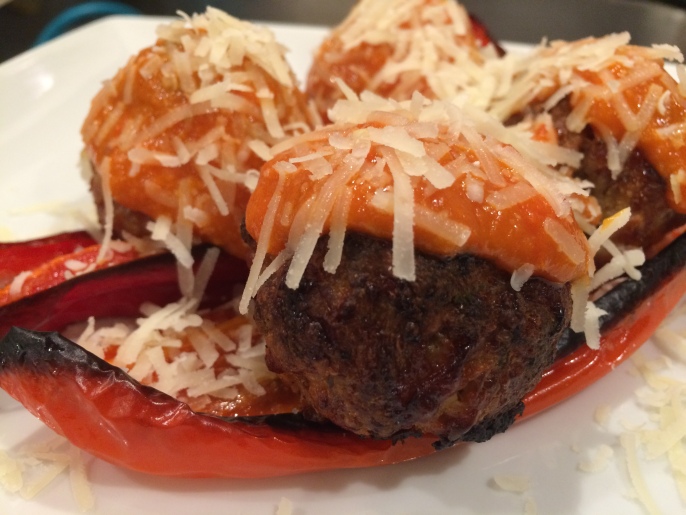
Roasted Red Peppers with Sausage & Ricotta Meatballs

Standard

We had this one tonight. It was pretty dang delicious and had such an interesting depth of flavor. I saw the recipe for Pork and Ricotta Meatballs in Cook’s Country and saw lots of potential in it, including ways to use those pesky sweet red peppers we had hiding in the veggie drawer. So here is my wildly adapted version of this recipe, broken into a few parts.

Sausage and Ricotta Meatballs
Serves 4-5

2 slices bread, torn into small pieces
4 oz (1/2 cup) ricotta
5 sweet italian sausage links (total about 20 oz), removed from casings
1/4 cup Parmesan Reggiano Cheese, grated
1 1/2 Tb dried parsley
1 egg
1 shallot, minced
2 garlic cloves, minced
1/2 Tb salt
3/4 tsp pepper
1/2 tsp grated lemon zest (1/2 lemon)

1. Adjust oven rack to lower-middle position and heat oven to 450 degrees. Set wire rack on a baking sheet lined with aluminum foil or baking pad. Spray liberally with Pam.
2. Combine bread and ricotta in a large bowl and mix with a fork, let stand, and mix again, until a smooth paste forms, up to 10 minutes.
3. Add sausage, Parmesan, parsley, egg, shallot, garlic salt, pepper, and lemon zest to bread mixture and mix with hands until thoroughly combined.
4. Divide mixture into 16 equal portions. Roll meat between wet hands to form meatballs and sapce evenly on prepared wire rack.
5. Roast meatballs until browned and cooked through to about 155-165 degrees. Check after about 35 minutes. If not hot enough, put back in for another 10-15 minutes.

Roasted Red Peppers
Serves 4-5

4 sweet red peppers
1 Tb olive oil
pinch salt, pepper
juice of 1/2 lemon

1. Cut out the stems and remove the seeds from peppers. Slice length-wise.
2. Brush olive oil on peppers on all sides. And sprinkle with lemon juice.
3. Sprinkle with salt and pepper.
4. Roast along with the meatballs and take out right as you notice the edges turning dark. These should be soft when poked with a fork.

Sauce
Serves 4-5

1/8 c olive oil
5 garlic gloves, smashed and peeled
2 medium tomatoes, cored and chopped
juice of 1/2 lemon
salt and pepper

1. While meatballs and peppers are in the oven, combine oil and garlic in a dutch oven set over low heat and cook until garlic is soft and golden on all sides, about 8-10 minutes, stirring occasionally.
2. Stir in tomatoes. Cover with lid slightly ajar. and bring to simmer over medium high heat.
3. Squeeze lemon juice into sauce. Season with salt and pepper. Reduce heat to medium low and simmer until sauce has thickened somewhat. Turn off heat and let sit.
3. When you take the meatballs and peppers out of the oven, pour this into a food processor and process until smooth.

To plate, with an extra 1/4 cup grated Parmesan:
1. Lay down two roasted red pepper halves.
2. Sprinkle some Parmesan over peppers.
3. Place 4 meatballs on top of the peppers.
4. Ladle sauce over the meatballs.
5. Garnish with more Parmesan.

Then enjoy! I loved the garlic and lemon in this dish. The sausage was incredible. The meatballs were killer and could’ve been just fine on their own, but the sweetness of the red peppers and the sauce brought everything together.

Nutrition:
Weight Watchers Points: 12

22073655161_3b716477d7_o

22073656311_1707816835_o

Banana Birthday Cake with Cream Cheese Frosting

Standard

On July 16th, my son, Desmond, turned 2. For his first birthday last year I made a ton of different cakes so he had multiple cake smash sessions with all the people who wanted to celebrate his birthday throughout the month. This year I used the same mini cake pan to make a little version of this delicious banana cake recipe.

As is our birthday tradition, we enjoyed the cake on the bank of Walden Pond, amid the beauty of nature and warm summer sun.

If you’re looking for a different but delicious birthday cake recipe, I highly recommend this one!

Mini Banana Cake (6 inch diameter)

Serves: 5

2 medium bananas, super ripe, mashed
2/3 tsp fresh lemon juice
1 c flour
1/2 tsp baking soda
1/8 tsp salt
1/4 c butter, softened
3/4 c sugar
1 egg
2/3 tsp vanilla extract
1/2 c buttermilk

1. Preheat oven to 275 degrees.

2. Grease and flour a 6 inch round pan.

3. In a small bowl, mix mashed banana with lemon juice. Set aside.

4. In medium bowl, mix flour, baking soda, and salt. Set aside.

5. In large bowl, cream butter, and sugar until light and fluffy.

6. Beat in egg, then stir in vanilla.

7. Beat in flour mixture alternately with buttermilk.

8. Stir in banana mixture.

9. Pour batter into prepared pan and bake for about 40 minutes or until toothpick inserted in center comes out clean.

Cream Cheese Frosting

1/4 c butter, softened
4 oz cream cheese
1 1/4 c powdered sugar
1/3 tsp vanilla extract

1. Cream butter and cream cheese until smooth.

2. Beat in vanilla. Add powdered sugar and beat on low speed until combined, then on high speed until frosting is smooth.

3. Spread on cooled cake. Decorate with blueberries– they went great with the banana/lemon in the recipe!

Note: To end up with a super moist cake, we put the cake in the freezer for about 20 minutes after it cooled a bit. Then we spread the frosting on. Seemed to work– it was incredibly moist and delicious!

Nutrition:
Weight Watchers Points: 18

20398397809_d83f056f31_o

Zucchini Garden Chowder

Standard

Drowning in zucchini? We are. (Thanks Stillmans!) Not a bad thing, either. We just have to find creative ways to use a lot of it. So this week I went on a zucchini recipe binge. Good news is that I loved them all and am pleased to share them with you. This one is also super easy for cleanup because it’s basically a one pot meal, which I always love. And, best of all, Desi (almost 2 years old) LOVED it, so you know it’s got to be kid friendly!

(Adapted from Simply in Season)

Serves: 6-8

2 Tb butter
2 medium zucchini, chopped
1 medium onion, chopped
2 Tb fresh parsley, chopped (I only had dried)
1 Tb fresh basil, chopped
1/3 cup flour
3/4 tsp salt
1/2 tsp pepper
3 cups water
3 chicken bouillon cubes/packages
1 tsp lemon juice
2 cups tomatoes, chopped
1 1/2 cups evaporated milk (1 can)
2 cups corn (I used frozen)
2 cups cheddar cheese, shredded
1/3 cup Parmesan cheese, grated

1.) Melt butter in soup pot or french oven over medium heat.
2.) Add zucchini, onion, parsley, and basil. Saute until tender.
3.) Stir flour and seasonings into vegetables. Gradually stir in water to mak ea smooth stock.
4.) Add lemon juice and bouillon and mix well. Bring to a boil, reduce heat and cook, stirring often for 2 minutes.
5.) Add tomatoes, evaporated milk, and corn. Reduce heat, cover and simmer for 5 minutes until corn is tender.
6.) Add cheese just before serving and stir in.

Nutrition:
Weight Watchers Points: 8

One pot meal-- just a whole bunch of veggies, cheese, and your french oven.

One pot meal– just a whole bunch of veggies, cheese, and your french oven.

IMG_8024

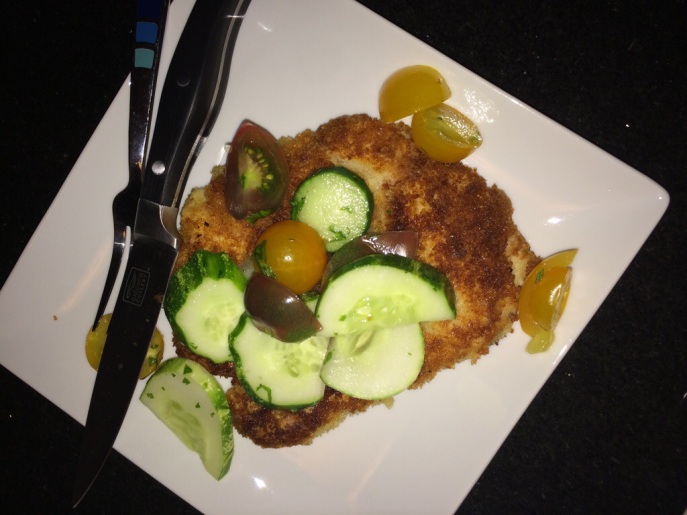
Chicken Paillard with Summer Salad

Standard

What to do with those delicious cucumbers (or pickling cucumbers, as the case may be) and cherry tomatoes? Like a message from heaven, this recipe found its way into my inbox last week and within 24 hours this dish was on the table. Hopefully this post will be similarly times for you.

20140730-200348-72228403.jpg

This recipe is adapted from its original version on Weelicious, which is full of family-friendly recipes, often especially geared toward kids.

Crispy Chicken Paillard with Summer Salad (serves 2 normal appetites and 1 lighter)

Prep Time: 15 mins,
Cook Time: 10 mins,

Ingredients

2 boneless and skinless chicken breasts
1/2 cup flour
1 large egg, whisked
1 cup panko bread crumbs
1/2 teaspoon salt
1 Tb canola or vegetable oil, for the pan
1/2 cup halved cherry tomatoes
1 pickling cucumber, thinly sliced
1 tablespoon chopped cilantro
1 teaspoon lemon juice

1.Place one chicken breast between 2 sheets of parchment paper and pound using a tenderizer until about 1/3 inch and even thickness. Repeat with all the breasts.
2. Season each chicken breast with 1/4 teaspoon salt.
3. In 3 small dishes place flour, egg and breadcrumbs separately.
4. Dredge both sides of chicken breast in flour, followed by egg and then bread crumbs and repeat with remaining breasts.
5. Heat about 2 tablespoons of oil in a skillet over medium high heat and place chicken breasts in skillet (do in batches if needed and add extra oil if needed for second batch)
6. Fry until golden brown, about 5-6 minutes and flip to brown other side
7. Place tomatoes, cucumbers, corn and cilantro into a mixing bowl. Drizzle with lemon juice and toss to coat
8. When chicken is golden brown and fully cooked place on a cooling rack to cool slightly
9. Spoon salad over top and serve immediately.

Source: http://weelicious.com/2014/07/25/chicken-paillard-with-summer-salad-recipe/

So here’s how I would adapt this next time:
* Definitely use seasoned panko or include grated Parmesan cheese in with the panko OR both! The breeding needs a bit more flavor.
* Maybe dice the cucumber instead of slicing. The chunkier pieces were definitely easier to eat.
* If I have corn on hand, I would try to add that into the salad just to try it the way Weelicious does it.

Regardless, I loved the salad itself. I will definitely do that again– a little lemon and cilantro? Done!

Quick & Easy Dinner

Standard

20140713-020622-7582603.jpg

After coming home from our travels to a friend’s wedding over the 4th of July, I was in a frenzied state trying to use as much of our CSA produce as possible so our fridge wouldn’t explode. I made a ton of food for Desi, our almost one year old– mostly steamed veggies. But I wanted to try something different to try to use up some of the radishes, which we seem to get more of each week. I opted for an easy “slaw” of my own creation.

Apple-Radish Slaw

1 Granny Smith apple
3 larger radishes
1/2 lemon

1.) Shred the radishes and apple. (Easier said than done with the apple. The peel was a pain to try to shred, but I wanted to keep it to enhance the visual appeal of the dish).
2.) Combine shredded apple and radish in a bowl.
3.) Squeeze lemon juice on apple and radish (for flavor and to try to keep the apple from browning. After about an hour in the fridge, it was clear that the browning was still definitely happening).

I’ve seen recipes for something like this with vinegar and other condiments, but I honestly think this was great as is. Tons of flavor, super fresh tasting, lots of crunch. Yum! Desi enjoyed it too!

The other side item to this meal was a zucchini chopped into spear shapes, sautéed.

1 zucchini, halved, then cut long-ways, then sliced into spears
1/2 Tb Extra Virgin Olive Oil
1/4 tsp garlic powder
1/4 tsp seasoned salt
1/2 Tb Parmesan cheese, grated

1.) Heat the oil in a pan and them add zucchini. Be sure to toss to coat with the oil.
2.) Dust the zucchini with garlic powder and seasoned salt throughout cooking.
3.) Continue to cook and place cover on top of pan to keep the zucchini moist and speed up the cooking by sort of steaming it.
4.) Sprinkle Parmesan a couple of minutes before done to the tenderness you prefer. This will allow it to melt a bit.

The meat portion of this dish has nothing healthy in it. It’s an English muffin with a grilled beef brat split long-ways and splayed between the bread. I topped mine with a piece of cheese, Heinz (ketchup), and mustard.

Combined it made for a pretty yummy impromptu meal.