Mac & Cheese Impossible Pie

Standard

This sounded incredible when I picked up the recipe card.  My husband and son love mac & cheese.  This felt like it was going to be a slam dunk.  And it was alright, but I think there are some adaptations I’d make next time around– more cheese of a different kind, less potato, and maybe some other veggies with a bit more flavor… like zucchini or broccoli.  But here I give it to you unaltered from how I originally prepared it and encourage you to make it per the instructors or try your own fixes.  Let me know how it goes!

Serves 6
Adapted from WimpyVegetarian.com

Ingredients:
1 Tb butter
2 c shredded sharp cheddar cheese
1 c uncooked large elbow macaroni
2 1/4 c milk
4 eggs
1/2 c baking mix (Bisquick)
1/4 tsp onion powder
1/2 tsp garlic powder
1/4 tsp smoked paprika
1/8 tsp cayenne pepper
1/4 c shredded Parmesan cheese
1 c potato, shredded

1. Heat oven to 400 degrees and coat a 10 inch pie dish with butter. Place on baking sheet.
2. Mix together the cheese and macaroni in the pie dish. Thoroughly mix the remaining ingredients in a medium bowl and pour over the macaroni and cheese. Push down any macaroni to make sure it is entirely covered with liquid.
3. Bake for 40-50 minutes until the top is puffy and the macaroni are completely cooked. A knife inserted into the pie should come out clean.
4. Allow the pie to cool for 15 minutes before slicing and serving.

Nutrition:
Weight Watchers Points = 10

Precooked.

Precooked.

Blueberry Apple Cobbler

Standard

Every year we try to celebrate the end of summer and the beginning of fall by going blueberry and apple picking on Labor Day. We did that again this year and I decided to adapt a Blueberry Cobbler recipe I found by making use of both of the delicious fruits we’d picked fresh. This was super tasty, potentially just the tiniest bit too sweet. At some point we had the great idea to add vanilla ice cream and that rounded out the flavors perfectly.

Serves 5
Adapted from an adaptation of ThePioneerWoman.com

Ingredients:
1/2 stick butter, melted plus more for greasing pan
1 1/4 c plus 2 Tb sugar
1 c flour
1 c milk
1 1/2 c fresh blueberries
1 large apple, peeled and chopped

1. Preheat oven to 350 degrees. Grease a square baking dish with butter.
2. In a medium bowl, whisk 1 cup sugar with the flour and milk. Whisk in the melted butter.
3. Rinse blueberries and pat dry.
4. Pour the batter into the baking dish. Sprinkle blueberries and apples evenly over the top of the batter. Sprinkle with 1/4 c sugar over top.
5. Bake until golden brown and bubbly, about an hour. When 10 minutes of cooking time remains, sprinkle remaining 2 Tb of sugar over top.
6. Optionally, serve with whipped cream or vanilla ice cream.

Nutrition:
Weight Watchers Points: 12 (without whipped cream or ice cream)

Pre-sugaring. Pretty delicious looking still.

Mm… yup.

Italian Zucchini Pie

Standard

Want dinner tonight and dinner for later? This is a great recipe for that! It’s already enough for 2 zucchini pies, which taste a million times better than they sound. My two year old is still talking about Zucchini Pie. And we have another one in the freezer ready to go whenever we need it. Here we go.

Yields 2 pies; Each pie serves at least 4 (Weight Watchers Points based on 4 servings per pie)
Adapted from Simply in Season

Crust Ingredients:
1/4 c warm water
1 Tb active dry yeast
1/4 c milk
1 Tb olive oil
1 egg, beaten
1/4 c whole wheat flour
1/4 c Parmesan cheese
1 tsp salt
1-2 tsp fresh basil, chopped
2 c bread flour

1. Mix warm water and dry yeast until it dissolves. Set aside.
2. Combine milk, oil, and egg in a mixing bowl. Add dissolved yeast and stir.
3. Blend in wheat flour, cheese, salt, and basil.
4. Add 1/2 c bread flour at a time to make a smooth but slightly sticky dough.
5. Place dough in a well greased bowl, cover with a damp cloth, and place in a warm place while preparing zucchini filling.

Filling Ingredients:
1/4 c butter
8 cups zucchini, thinly sliced
1.5 c onion, chopped
1 clove garlic, minced
1 Tb fresh basil, chopped (or 1 tsp dried)
1 Tb fresh oregano, chopped (or 1 tsp dried)
1/2 tsp each dried thyme, rosemary, sage, parsley
1 tsp salt
1/2 tsp pepper
5 large eggs, beaten
4 c mozzarella cheese, shredded
4 tsp specialty mustard
1/4 c Parmesan cheese

1. Melt butter in frying pan over medium heat. Add zucchini and onions and saute until soft, about 10 minutes. Remove from heat and pour into a very large bowl.
2. Stir into large bowl the garlic, herbs, salt and pepper.
3. Combine eggs and mozzarella in a separate bowl, then stir into zucchini mixture.

Back to the crust and putting it all together…
1. Divide dough in half. Place each half on a lightly floured surface and roll into a circle about 12 inches in diameter.
2. Set each into a lightly greased 10 inch pie dish and crimp edges as you would a pie crust.
3. Spread the bottoms and sides of pie crusts with mustard.
4. Divide the zucchini mixture between the two crusts. Sprinkle with Parmesan cheese on top.
5. Bake in preheated oven at 375 until center is set, about 18-20 minutes. (To test if set, jiggle pie after time. If it is mostly solid, you should be good.) Let stand 10 minutes before serving.

I recommend eating one and freezing the other, unless you’ve got lots of mouths to feed. If you let it cool completely and have greased the pan well enough, it should be sturdy enough that you can pop it out of the pie pan and slip it into a gallon freezer bag. It’ll hold its shape and be good for you whenever you need a quick meal to just reheat.

Nutrition:
Weight Watchers Points: 10

The piece our 2 year old ate.

The piece our 2 year old ate.

The crust is amazing!

The crust is amazing!

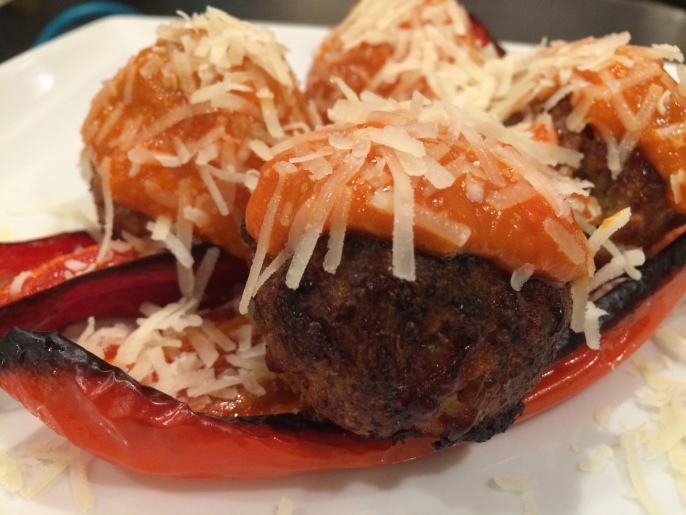
Roasted Red Peppers with Sausage & Ricotta Meatballs

Standard

We had this one tonight. It was pretty dang delicious and had such an interesting depth of flavor. I saw the recipe for Pork and Ricotta Meatballs in Cook’s Country and saw lots of potential in it, including ways to use those pesky sweet red peppers we had hiding in the veggie drawer. So here is my wildly adapted version of this recipe, broken into a few parts.

Sausage and Ricotta Meatballs
Serves 4-5

2 slices bread, torn into small pieces
4 oz (1/2 cup) ricotta
5 sweet italian sausage links (total about 20 oz), removed from casings
1/4 cup Parmesan Reggiano Cheese, grated
1 1/2 Tb dried parsley
1 egg
1 shallot, minced
2 garlic cloves, minced
1/2 Tb salt
3/4 tsp pepper
1/2 tsp grated lemon zest (1/2 lemon)

1. Adjust oven rack to lower-middle position and heat oven to 450 degrees. Set wire rack on a baking sheet lined with aluminum foil or baking pad. Spray liberally with Pam.
2. Combine bread and ricotta in a large bowl and mix with a fork, let stand, and mix again, until a smooth paste forms, up to 10 minutes.
3. Add sausage, Parmesan, parsley, egg, shallot, garlic salt, pepper, and lemon zest to bread mixture and mix with hands until thoroughly combined.
4. Divide mixture into 16 equal portions. Roll meat between wet hands to form meatballs and sapce evenly on prepared wire rack.
5. Roast meatballs until browned and cooked through to about 155-165 degrees. Check after about 35 minutes. If not hot enough, put back in for another 10-15 minutes.

Roasted Red Peppers
Serves 4-5

4 sweet red peppers
1 Tb olive oil
pinch salt, pepper
juice of 1/2 lemon

1. Cut out the stems and remove the seeds from peppers. Slice length-wise.
2. Brush olive oil on peppers on all sides. And sprinkle with lemon juice.
3. Sprinkle with salt and pepper.
4. Roast along with the meatballs and take out right as you notice the edges turning dark. These should be soft when poked with a fork.

Sauce
Serves 4-5

1/8 c olive oil
5 garlic gloves, smashed and peeled
2 medium tomatoes, cored and chopped
juice of 1/2 lemon
salt and pepper

1. While meatballs and peppers are in the oven, combine oil and garlic in a dutch oven set over low heat and cook until garlic is soft and golden on all sides, about 8-10 minutes, stirring occasionally.
2. Stir in tomatoes. Cover with lid slightly ajar. and bring to simmer over medium high heat.
3. Squeeze lemon juice into sauce. Season with salt and pepper. Reduce heat to medium low and simmer until sauce has thickened somewhat. Turn off heat and let sit.
3. When you take the meatballs and peppers out of the oven, pour this into a food processor and process until smooth.

To plate, with an extra 1/4 cup grated Parmesan:
1. Lay down two roasted red pepper halves.
2. Sprinkle some Parmesan over peppers.
3. Place 4 meatballs on top of the peppers.
4. Ladle sauce over the meatballs.
5. Garnish with more Parmesan.

Then enjoy! I loved the garlic and lemon in this dish. The sausage was incredible. The meatballs were killer and could’ve been just fine on their own, but the sweetness of the red peppers and the sauce brought everything together.

Nutrition:
Weight Watchers Points: 12

22073655161_3b716477d7_o

22073656311_1707816835_o

Super Stuffed Tortillas

Standard

Again, I’m drowning in bell peppers (and zucchini, still, and now corn too!), so I went after this delicious sounding dish from my Simply in Season cookbook. The original version was meatless, but I felt like having some tasty meat tonight, so cue the ground beef. I have to say, it turns out better than I even expected. And Desi, our 2 year old, ate a ton of it. Huge win-win in my book.

(Adapted from Simply in Season)
Serves 6-8

4 tsp oil, divided
1 large clove garlic, minced
1 small onion, chopped
1 green pepper, chopped
2 c corn, cut fresh from uncooked cob
1 medium zucchini, quartered, then sliced
1 Tb ground cumin
1 c canneloni beans (original recipe calls for black beans, but we had these on hand already)
1 c chicken broth
1 lb ground beef
2 tsp Southwest Seasoning (or taco seasoning)
6 Tb salsa
6-8 flour tortillas
1/2 c cheddar cheese, shredded

1. In a deep skillet, saute garlic in 2 tsp oil for about a minute. Add onion and pepper and saute until tender-crisp.

2. Add corn, zucchini, and cumin and continue to saute until all vegetables are tender.

3. Meanwhile, brown ground beef in a separate skillet. When just a little pink is still showing, sprinkle on southwest or taco seasoning. Continue cooking.

4. Add beef to skillet with veggies. Add beans, chicken broth, and salsa. Cook until there is no excess moisture. Turn off heat.

5. Wash out the skillet you used for the beef and heat a small amount of oil, then add a single tortilla. In the middle of the tortilla sprinkle cheese. Let it melt a little, then scoop about 1/2 cup of the vegetable/meat mixture and continue cooking. When the sides of the tortilla start rising a bit and the tortilla is crispy, fold it up and plate. Continue cooking individual tortillas this way.

6. Serve with sour cream.

Nutrition:
Weight Watchers Points: 9 (10 with sour cream)

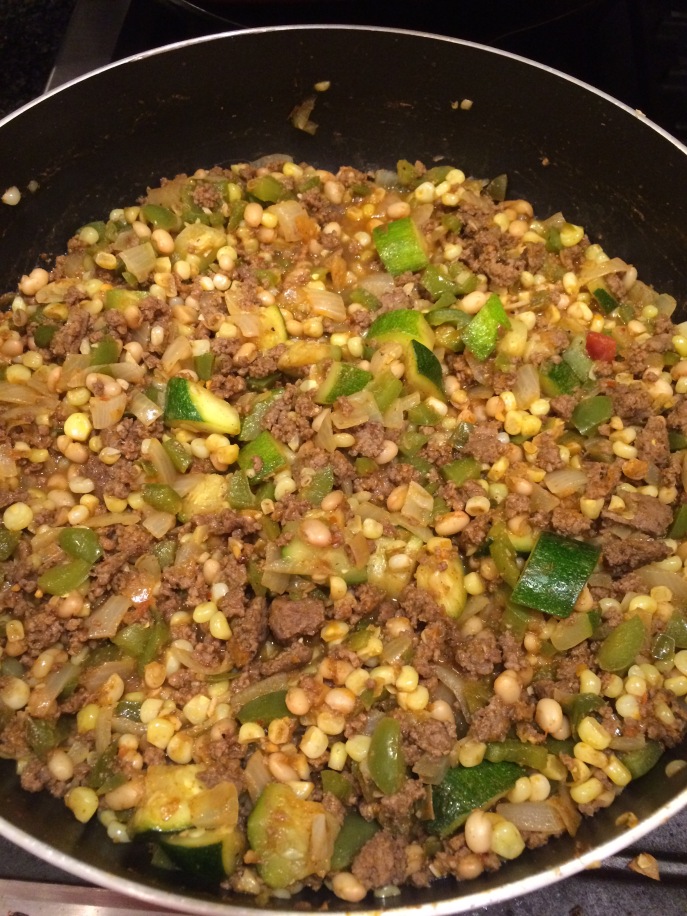
Filling mixture of veggies & meat

Filling mixture of veggies & meat

Tortilla cooking in skillet

Tortilla cooking in skillet

Stuffed Bell Peppers

Standard

Stillman’s CSA strikes again… an abundance of green peppers all in the last few weeks. I love stuffed peppers and this recipe that I found on Pinterest sounded like a winner. It ended up being pretty delicious and resulted in a nice variety of leftovers. More on that after the recipe.

(Adapted from Kalynskitchen.com)
Serves 4 + Small leftovers

2 large green bell peppers
1 c uncooked brown rice
1 c onion, diced
3 tsp olive oil
1 link bratwurst
1/2 tsp dried oregano
1/2 c grated Parmesan
1/4 c shredded mozzarella

1. Cook rice according to directions on package, or make in a rice cooker.

2. Preheat oven to 375. Prepare a square baking dish by spraying with cooking spray.

3. Slice the tops off of the peppers and remove the stems. Dice the remaining flesh from the pepper top.

4. Slice peppers longways so you have 4 halves total. Lay the peppers down, cut side up, and notice if one side seems to be higher than the other. Where you see this, slice off about a half inch thick section and dice that as you did with the pepper top. You should end up with about a half cup of diced pepper. (If not, don’t stress… you want your peppers to be like little bowls, so don’t trim too much!)

5. Place peppers in the baking dish, fitting them so they move as little as possible.

6. Heat 2 tsp of the oil in a large skillet. Add the diced onion and pepper and cook about 3 minutes until somewhat softened. Remove to a bowl.

7. In skillet, add remaining 1 tsp of oil. Squeeze bratwurst out of its casing and cook until browned, breaking it up into small pieces throughout the cooking.

8. Add onion/pepper mixture back into skillet. Add oregano. Salt and pepper to taste.

9. Add the cooked rice and Parmesan cheese and cook long enough to warm, about 2 minutes.

10. Spoon the mixture into the hollowed out peppers. Fill them as much as you can until the filling starts falling out. Sprinkle with mozzarella cheese, then bake for about 20 minutes, until peppers can be punctured with fork fairly easily, but still have a little resistance.

11. If you had any leftover filling, place in small ramekins and top with mozzarella as well. Bake alongside the stuffed peppers for variety in your leftovers.

Nutrition:
Weight Watchers Points: 6

3 of the 4 stuffed peppers nestled in the baking dish

3 of the 4 stuffed peppers nestled in the baking dish

Bonus filling in ramekins!

Bonus filling in ramekins!

Kielbasa with Bok Choy Gratin

Standard

As you can tell from my previous post, I had some bok choy on hand and I had great plans for it. I found this amazing sounding recipe for bok choy gratin on a weird website call chocolate broccoli. I put all the ingredients into my Weight Watchers app so I could figure the points value, and planned to go back to the recipe when the time came to make the dish. Unfortunately in between my finding the recipe and my going back to actually prepare the recipe, chocolate broccoli had allowed its domain to expire. So… yeah. The result is that although the ingredients were inspired by that page, this one is otherwise entirely original. So, enjoy.

Serves: 4

1 clove garlic
1 Tb butter, divided in half
1 1/2 c onion, chopped
2 small heads bok choy, chopped (leaves & stems)
1 1/2 oz prosciutto, diced
1/4 c chicken stock
3/4 c milk
1 Tb flour
salt & ground black pepper to taste
4 oz Gruyere, shredded
1 Tb panko breadcrumbs

1. Preheat oven to 425.

2. Slice garlic in half and rub along the inside of a casserole dish. Then mince the garlic.

3. Melt 1/2 Tb butter in a large skillet. Add minced garlic. Cook about 1 minute, then add chopped onion.

4. In a separate pot, steam bok choy until you can easily insert a fork into the stalk pieces.

5. Add chicken stock to the garlic/onion skillet and stir.

6. Add bok choy and prosciutto to the skillet. Stir and cook until most of liquid is absorbed.

7. Pour vegetable mixture into prepared casserole dish.

8. In same skillet, melt the other 1/2 Tb butter. Add milk and heat for a minute, then add flour and whisk until smooth.

9. Slowly add about 2/3 of the shredded gruyere and whisk continuously to smooth out sauce.

10. Pour sauce over veggies in casserole dish.

11. Sprinkle panko over top.

12. Bake, covered, about 15-18 minutes.

13. Remove cover and sprinkle with the remaining 1/3 gruyere. Continue baking, uncovered, about 5 minutes more, until golden brown on top.

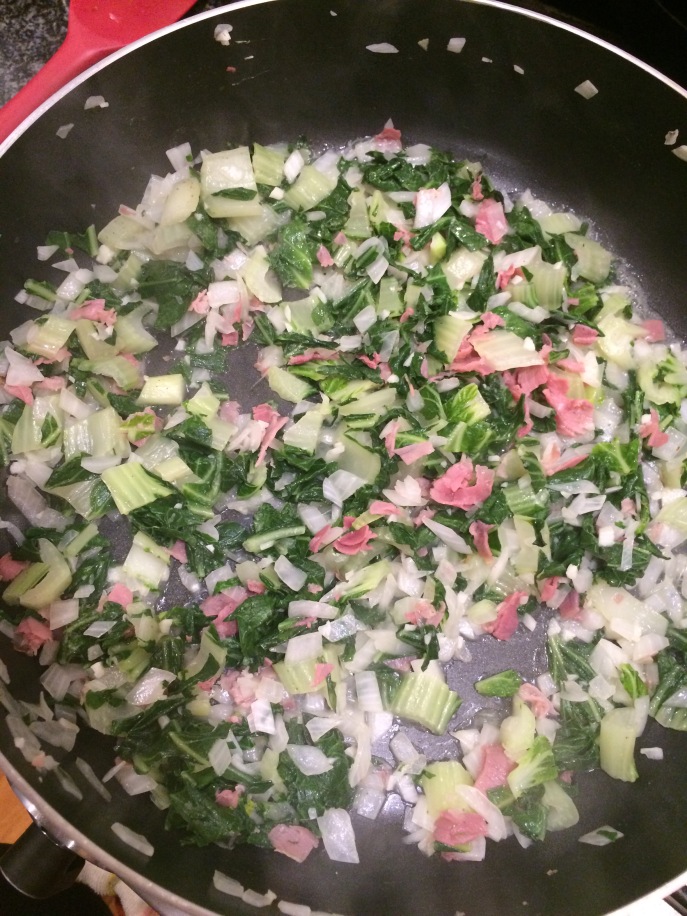
Skillet of garlic, onions, prosciutto, and bok choy.

Skillet of garlic, onions, prosciutto, and bok choy.

Vegetables and sauce mixed in casserole

Vegetables and sauce mixed in casserole

Bok Choy Gratin, golden and delicious

Bok Choy Gratin, golden and delicious

For the kielbasa:
As many links as you have people eating

1. Place frozen kielbasa links on a cast iron griddle and bake in the oven along with the bok choy gratin dish for the duration of the 20-23 minutes.

I *loved* this combination. It felt just right for the time of year of summer turning into fall. The kielbasa was killer because it got so well cooked that it was a little crunchy on the outside, but stayed super moist inside because it had been frozen to start out. And this bok choy gratin had incredible flavor. I highly recommend this! And encourage you to swap out the bok choy, and try this with whatever you have on hand– broccoli, spinach, whatever!

Nutrition:
Bok Choy Gratin Weight Watchers Points: 7
Kielbasa Weight Watchers points: 5 (for 2 oz)

Cooked kielbasa

Cooked kielbasa

Wilted Veggies? Try this.

Standard

Even before we had our CSA membership, but especially since we get *so much* produce week after week, I’m bad about using my veggies quickly enough. Does that ever happen to you? Well I encourage you not to give up on those wilted veggies by throwing them away. You can save them with some water, ice, and a little bit of patience. If you’re ever in that situation with wilted veggies (in my case most recently, it was bok choy)–

A sad couple bunches of bok choy as pulled out of the fridge.

A sad couple bunches of bok choy as pulled out of the fridge.

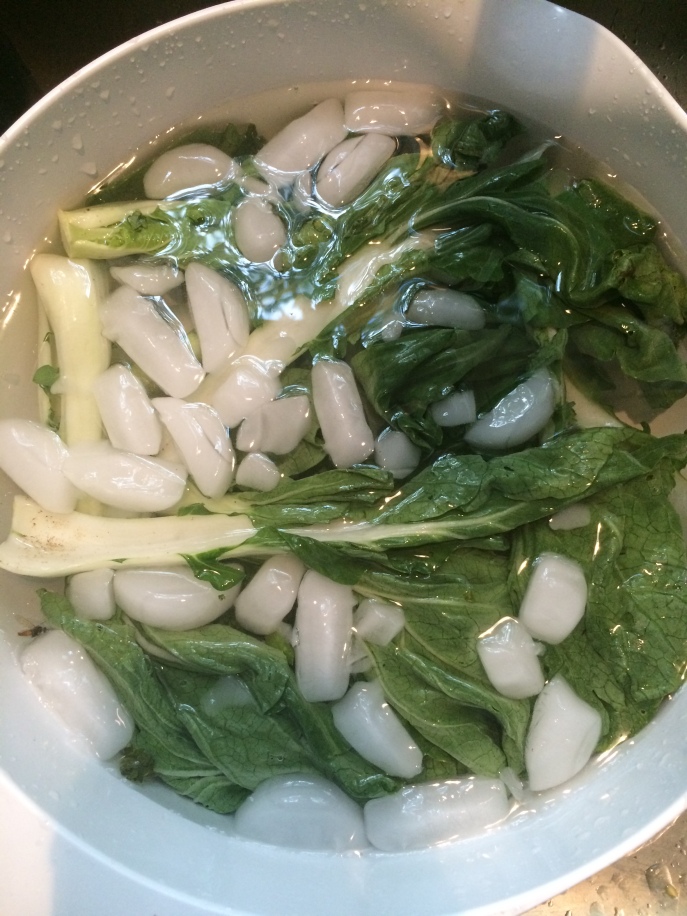
Think about these veggies as if they were a sad plant in your garden desperately in need of a good watering. That’s really all they need. So I chopped the bottoms off the bok choy bunches and peeled the leaves apart. I discarded a few of the saddest leaves– even a good ice bath won’t help in some cases, then put the rest in the biggest bowl I could find, covered them with cold tap water, and then dumped a few handfuls of ice cubes on top. Then I left it sit for a while. (Note, the other great thing about this ice bath is that it’s also serving a dual purpose of washing the veggies for you. Agitate them a little bit every once in a while and all the dirt will fall to the bottom of that big bowl for you to wash away later.)

A large bowl for the bok choy, housing a nice ice water bath.

A large bowl for the bok choy, housing a nice ice water bath.

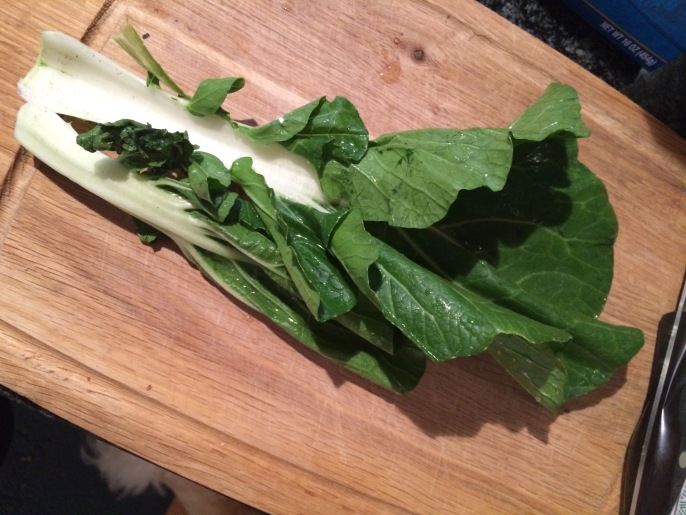
How long did I let it sit? Not sure. I recommend that you keep checking back until all the ice is melted and the majority of the leaves are perky and fresh looking, like this–

Perky bok choy after the ice melted.

Perky bok choy after the ice melted.

And, finally, for the after shot, of just a couple of the leaves, beautiful and like they were just picked.

Beautiful, perfect bok choy, ready for my next delicious meal!

Beautiful, perfect bok choy, ready for my next delicious meal!

I really do use this trick all the time for a huge variety of veggies– lettuce, kale, swiss chard, spinach, broccoli, green beans, cucumbers, beets, radishes, carrots, etc. If your veggies are really sad, definitely take the time to trim the ends (similar to cut flowers you might keep in a vase) before dropping in the ice bath.

I hope this helps you save some money and use those veggies you’ve kept on hand a little bit too long!

Banana Birthday Cake with Cream Cheese Frosting

Standard

On July 16th, my son, Desmond, turned 2. For his first birthday last year I made a ton of different cakes so he had multiple cake smash sessions with all the people who wanted to celebrate his birthday throughout the month. This year I used the same mini cake pan to make a little version of this delicious banana cake recipe.

As is our birthday tradition, we enjoyed the cake on the bank of Walden Pond, amid the beauty of nature and warm summer sun.

If you’re looking for a different but delicious birthday cake recipe, I highly recommend this one!

Mini Banana Cake (6 inch diameter)

Serves: 5

2 medium bananas, super ripe, mashed
2/3 tsp fresh lemon juice
1 c flour
1/2 tsp baking soda
1/8 tsp salt
1/4 c butter, softened
3/4 c sugar
1 egg
2/3 tsp vanilla extract
1/2 c buttermilk

1. Preheat oven to 275 degrees.

2. Grease and flour a 6 inch round pan.

3. In a small bowl, mix mashed banana with lemon juice. Set aside.

4. In medium bowl, mix flour, baking soda, and salt. Set aside.

5. In large bowl, cream butter, and sugar until light and fluffy.

6. Beat in egg, then stir in vanilla.

7. Beat in flour mixture alternately with buttermilk.

8. Stir in banana mixture.

9. Pour batter into prepared pan and bake for about 40 minutes or until toothpick inserted in center comes out clean.

Cream Cheese Frosting

1/4 c butter, softened
4 oz cream cheese
1 1/4 c powdered sugar
1/3 tsp vanilla extract

1. Cream butter and cream cheese until smooth.

2. Beat in vanilla. Add powdered sugar and beat on low speed until combined, then on high speed until frosting is smooth.

3. Spread on cooled cake. Decorate with blueberries– they went great with the banana/lemon in the recipe!

Note: To end up with a super moist cake, we put the cake in the freezer for about 20 minutes after it cooled a bit. Then we spread the frosting on. Seemed to work– it was incredibly moist and delicious!

Nutrition:
Weight Watchers Points: 18

20398397809_d83f056f31_o

Raspberry Peach Cobbler

Standard

If you’re looking for a delicious and super summery seasonal dessert, this is definitely it. It’s easy, and Weight Watchers approved, since it came from them in the first place.

(Adapted from Weight Watchers)

Serves: 8 (1/2 c servings)
Time: 60 minutes total, 45 minutes cooking

6 medium peaches, halved, pitted, and thinly sliced (about 1 3/4 pounds)
3 Tb powdered sugar
1 c raspberries
3/4 c flour
3 1/2 Tb granulated sugar, divided
1/2 tsp baking powder
1/4 tsp baking soda
1/4 tsp salt
3 Tb regular butter, cold
1/3 c sour cream
1 tsp vanilla extract

1. Preheat oven to 350 degrees.

2. Places peaches in a medium bowl, toss with powdered sugar until sugar dissolves. In an 8-inch square baking pan arrange peach slices in several layers. Sprinkle raspberries over top.

3. In a large bowl combine flour, 3 Tb granulated sugar, baking powder, baking soda, and salt. Cut butter into flour mixture and work with a fork or pastry cutter until flour resembles course crumbs. (Mine appeared more like tiny crumbles, which was just fine.) Add sour cream and vanilla. Mix with fork until dough comes together.

4. Place clumps of crumb mixture over fruit. Sprinkle with remaining 1/2 Tb sugar.

5. Bake until top is golden brown and fruit begins to bubble, about 40 minutes. Cool 10 minutes before serving.

Nutrition:
Weight Watchers Points = 5

20397128910_6d2c658f30_o